Saturday, October 30, 2010

Mom's Spaghetti Sauce

Dear friends,

never say never!  or in my case, never say, "I'm finished canning." 

The farmer from whom I purchase much of my produce had a buyer for a large order of organic beefsteak tomatoes back out at the last minute, so my mom bought a bunch.  We brought them to my place for processing.  

Spaghetti sauce is really easy; it's best to use roma tomatoes, or a meaty tomato; but we had cheap beefsteak tomatoes and my mom needed spaghetti sauce, so that's what happened! 

I had a cute helper wash and sort tomatoes. 


My sister blanched, shocked, and peeled the tomatoes.  Core the tomato; cut an x or a slash on the bottom (for easier peeling).  Immerse in boiling water for 2 minutes; remove and plunge into cool water or ice-water.  Peel with ease! 


Finely blend the peeled tomatoes, and pour into containers (if the containers are see-through, that's even better).  Let sit overnight (a tip I learned from the Home Joys blog) so the water will separate from the meat.  


The next morning, I scooped the tomato meat out of the containers, and left the water in the bottom.   For a few containers, I used a turkey baster to suck the water out of the bottom as I did earlier in the year (this method is slow.  I don't recommend it.  Just use a measuring cup to scoop the blended tomato off the top!) I let this cook down for several hours while preparing everything else for the sauce.  

We got to work chopping onions, carrots, peppers, celery, and garlic (to taste - NO idea the measurements we used).  I cooked this in a stockpot for a few minutes. 


Mom's Cuisinart food processor sped the process up by about a million percent. 


Karissa loves to peel onions.  Mom blended up a bunch for me to freeze in baggies, too; this makes cooking easier on busy days!  She also shredded a bunch of carrots, which I measured out into recipe-size bags and froze, for making carrot-cake.  


 Karissa practiced her pull-ups, using a little cheating to climb up the sides of the door-jamb ... I don't think they'll let Mr H get away with that in boot camp! 


We mixed in oregano, basil, bay leaves, pepper, salt, brown sugar, and lemon juice.  Again, I have no idea the quantities we used - we just kept sampling and sprinkling! 


We filled quart jars, leaving 1" headspace, and processed in a pressure canner for 25 minutes, at 10 lbs pressure.  


My house smells like a spaghetti factory now!  It's quite delicious.  
saucily, 


Mrs H
tweet us @_mrs_h
Follow us on Facebook!


Drying & Storing Herbs

To my flavorful friends,

I don't have a lot of freezer space, so I have to dry or can a lot of my food for the year.  Drying isn't the optimal way of storing herbs; but it's certainly better than nothing!

It's starting to freeze here at nights.  I picked a lot of my basil ...

this picture is from the old place :D

I dried it ...


ground it up ....


Dried some bay leaves and sage from my cousin's garden ...


Stuffed it all in jars ...


Dried onion rings ...


Ground them up ...


Froze them in sealed baggies ....


 - I just crack one open and put it in a pint jar every so often ...


... And that's about the extent of my herb drying this year.  Tomorrow I am off to market to market to stock up on squash - I guess I'd better buy some garlic, too.

We bought 100 lbs of yellow onions, and they are all layered in newspapers and in boxes under a quilt.  They should last the two of us until mid-winter at least.  We never seem to have enough onions around here!   How do you store your onions?  Do you dry your herbs, or freeze them in ice cubes?  Do you grow all your own herbs?  Does anybody window-box their herbs, or keep broccoli sprouts? - I am curious to start doing that!

Happy Herbing!


Mrs H
tweet us @_mrs_h
Follow us on Facebook!

Randomly Chopping Basil

Dear random friends (whoever you may be), 

This is unrelated to anything but it's a useful cooking tip. 

To mince fresh basil easily: 

Stack the leaves, starting with the largest one. 


Roll like a cigar. 


Mince from end to end.  This is also known as chiffonade.  


Enjoy! 


Mrs H
tweet us @_mrs_h
Follow us on Facebook!

Wednesday, October 27, 2010

The Essence of the Extract

Dear fans of potato water as a preservative,

(and I don't mean by pickling your liver).  Vodka is very useful for preserving things as well as creating extracts and essences for cooking.  


Start with a very clean surface for making extracts - we don't want essence of leftover meatloaf here!  


Ginger Extract: After making ginger ice cream as described in a recent post, I had some leftover ginger-root.  To preserve it and simultaneously make a ginger extract that I can use in cooking, I peeled the ginger and cut it into thin slices.  I put it into pint jars and covered it with vodka.  This can be stored in the refrigerator or in a cool storage closet for some time.  The vodka will be sufficiently ginger-infused after 2 - 3 weeks for use in cooking.  


Lemon Extract: Wash and scrub an organic lemon or two and peel off the yellow outer skin - avoid the bitter white pith underneath.


Put the peel in a pint jar and cover with vodka.  It should be ready for use in about 2 weeks.  Add more vodka and peel as you wish to keep the jar full.  I've had mine in a cupboard since early September and it still smells as fresh as the day I put it in.


Orange Extract: The same instructions apply for orange as for lemon, except feel free to use half water and half vodka.  Everywhere I look it suggests this half-and-half ratio but I cannot find a reason for it; I tried a jar of just vodka and a jar of half water-half vodka and can't discern a difference.  So, in the end it might just be a money-saving tip.  Let me know if you have any challenges or if you know why this may be!


Vanilla Extract:  To start with, don't buy your beans at the grocery store unless you are desperate and/or don't need all that excess cash floating around.  You can buy excellent beans in bulk from Beanilla.  If you don't know which flavor of bean you prefer (Madagascar is the most commonly used in grocery store cooking extracts), I suggest the inexpensive 8-variety/3-of-each sampler package.

There are of course a wide variety of ways to make vanilla extract, but I will give you the simple recipe that I followed.

Split the bean in half lengthwise using a sharp knife.


Pack it into an 8-oz jar (you may need to cut it in half widthwise to make it fit, or just cram it like I did).  Fill the jar with vodka and put a tight lid on it.


Be sure to label it well so you know which variety of bean you used!  Let sit for 6 months before using - shake often!  I've heard that you can keep topping off the vanilla extract with more vodka after using it, but I haven't tried that yet.

the jar on the left has been sitting for several weeks;
the jar on the right is newly filled. 

With all of these extracts, I recommend picking up the jar and shaking it occasionally (or make things simple and do like I did and just move across town, so that it gets tossed in the back of a truck and jostled around for a while!).


Keep the jars in a dark and cool place.

chill out,


Mrs H
tweet us @_mrs_h
Follow us on Facebook!

Bringing the cows home: Beef Broth

Thanks for reading this post, I'm so excited to visit with you!  
After you've gleaned all the good information you need, visit our new blog platform at www.farmandhearth.com to read even more fascinating tidbits from the kitchen and the fields. 

Friends and fellow foodies,

Here is a simple recipe for a) beef broth b) keeping your house warm and toasty on a cold winter night.

My friend Miz Carmen had a lot of bones leftover from her beef butchering, and since she had a lot of things going on at the time asked if I could cook some of them down into broth and split the proceeds with her.  Let me tell you - nothing keeps the house warm like two 23-quart roasters and three small crockpots bubbling away for 12 - 24 hours!

Miz Carmen's Recipe for Basic Beef Broth

1. Brush bones and onions with olive oil.
2. Brown bones and meaty pieces (we included some soup bones), plus two onions at 400° for 20 min, until ‘browned’.
3.  Put in crock pots.  Add 1-2 T. salt to roaster, ½ to 1 c. shiraz (red wine) and 2 T. or so cider vinegar.
4.  Top off with water. 


5. Turn on 250° for 10-12 hours.
6.  Remove bones, onions and meat.  Set meat aside for other use.


(After picking out the large bones with tongs, I used a colander to scoop out the rest.)


7.  Strain broth through cheesecloth (or 2 stacked mesh strainers) into pots and cool in ice bath.


8.  If you put hot broth straight into the fridge, you’ll risk heating up your fridge to dangerous levels.  So even if you’re going to wait overnight to defat it, still cool it off before fridging it!

(I didn't have any ice, but I used blue- ice blocks and cold water in the sink, to cool the broth down before refrigerating overnight.)


9.  Remove fat.  Pour through cheesecloth again to get small pieces.


10.  Reheat broth to simmer.
11. Pour into jars.
12. Process 25 minutes at 10 pounds pressure.

Delicious, unseasoned home-made beef broth for your cooking pleasure!

A toast to warmth,


Mrs H
tweet us @_mrs_h
Follow us on Facebook!

Tuesday, October 26, 2010

Dinner in a Pumpkin

Dear fellow fans of fall,

Fall is here, and so is dinnertime.  Here is a festive-looking recipe that is not only easy to make, but entertaining to serve.  I found it in a newspaper clipping at a friend's house and jotted it down on a piece of paper.

this dinner was very popular when I made it at my cousin's house when some friends came into town.  Be sure to scrape out the soft insides of the pumpkin when you serve this.

This recipe conforms well to whatever you have in your kitchen.

1 medium pumpkin (5 - 7 lbs)
1-1/2 lbs ground beef
1/2 c chopped bell pepper
2 - 3 ribs chopped celery
1 medium to large onion, chopped
Salt and pepper
1/4 c soy sauce (use Bragg's Liquid Aminos if you wish for gluten-free*)
2 tbsp brown sugar
1 8-oz can chopped mushrooms, undrained
1 can cream of something soup (you can make a gluten-free soup and freeze it if you want)
2 c cooked rice

Wash and dry the pumpkin.  Cut a lid into the top of the pumpkin.  Scrape out the seeds and membrane.  (The pacifier in the picture below is totally optional.)


optional: set the pumpkin seeds in a pan with a bit of water and simmer for a few minutes while you continue to prepare the dinner. 


In a skillet, brown beef; add pepper, onion, celery, and saute until soft.  In a bowl, mix spices, sugar, soy, mushrooms, soup and rice.  Add to beef and vegetables.  Mix well; put into pumpkin.  Replace lid on pumpkin.


Set in a baking dish and bake for 1-1/2 hours at 350 deg F.


optional: drain pumpkin seeds and swab with a towel.  Grease a lined cookie sheet and scatter the pumpkin seeds on it.  Bake at 325 deg F 20 - 45 minutes (I have no idea how long it actually takes), stirring occasionally, until crispy and well roasted.  Pour into a bowl, add melted butter, and season with salt or other spices/herbs.  Serve as an appetizer to ward off the herds of locusts until the dinner is done.  


Enjoy your pumpkin! 

Mrs H

tweet us @_mrs_h for chewy nuggets
Pin us at Pinterest for pretty photos and intriguing articles
Follow us on Facebook for recipes, giveaways, and brilliant flashes of perspiration!


*I don't know how many places carry Bragg's near you, but if it isn't in your grocery store try the local nutrition store; our co-op sells it in bulk, next to the molasses and honey.  

The Things Autumn Brings Us

Dear patient friends,

Ever since moving, things have been happening nonstop.

Canning season is coming to a close - thankfully, because my energy to screw on bands and hang over a steaming pot is also coming to a close.  There are always further projects I'd like to undertake, but for now I need a break from the Kerr-Ball family names. (A few of you have asked for a pantry list, so I'll post that later.)

We are fully moved in, but I haven't opened all of the boxes in the library-office.  Some of it will have to go into the crawlspace storage so I will have to sort through it.  Unfortunately, Mr H's lightweight bike and favored form of transportation has disappeared and we are speculating that it was stolen from our back porch.  It's a 2nd story porch, but it isn't hard to climb up, as my brother tested the other day.


But these are petty pieces of news compared to the biggest news of all.  On October 21, Mr H was officially sworn into the US Navy.  His two years of training begin on March 22, 2011, when he ships out of Seattle.


What comes next?  Wait and see .... because I couldn't tell ya!

anticipating the future,

Mrs H
tweet us @_mrs_h for chewy nuggets
Pin us at Pinterest for pretty photos and intriguing articles
Follow us on Facebook for recipes, giveaways, and brilliant flashes of perspiration!

Next: It started with a decision ...

Saturday, October 9, 2010

Fresh Ginger Ice-Cream, which is not just called that because Shea likes it

Thanks for reading this post, I'm so excited to visit with you!  
After you've gleaned all the good information you need, visit our new blog platform at www.farmandhearth.com to read even more fascinating tidbits from the kitchen and the fields. 

Dear companionate ice-cream connoisseurs,

I love ice-cream, and I love homemade ice-cream. This recipe is called ginger ice-cream, and not just because Shea likes it and he's a redhead.  More so because it is made with a lot of fresh ginger root, as it were.

I made this last year for dessert after Christmas dinner, and it was a delightful festive touch.  I made it during the move a few days ago to use up some ginger, and when I served it to Mr H and his friend Shea tonight, Shea (after complaining about the name) said that the flavor made him think of Christmastime.

this recipe is from The Perfect Scoop

Fresh Ginger Ice Cream
about 1 quart. more tips on ice-cream making here.

3 ounces unpeeled fresh ginger root
1 cup whole milk (I used 2% cause I didn't have whole on hand)
2 cups heavy cream
3/4 cup sugar
pinch of salt
5 large egg yolks

in the pictures I am making a double batch, so don't be alarmed if your portions seem different when cooking


Cut the ginger in half lengthwise (making it more stable for slicing), and then cut it into thin slices.


Place the ginger in a medium, nonreactive saucepan.  Add enough water to cover the ginger by about 1/2 inch, and bring to a boil. Boil for 2 minutes, then drain, discarding the liquid.


Return the blanched ginger slices to the saucepan, then add the milk, 1 cup of the cream, sugar, and salt.


Warm the mixture, cover, and remove from the heat.  Let steep at room temperature for 1 hour.


Rewarm the mixture. Remove the ginger slices with a slotted spoon and discard.


I press the slices with the back of the spoon to get every last drop of gingery cream.  That's talent to do that AND take a picture, eh?


Pour the remaining 1 cup heavy cream into a large bowl and set a mesh strainer on top.


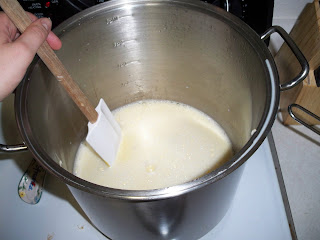
In a separate medium bowl, whisk together the egg yolks.  Slowly pour the warm mixture into the egg yolks, whisking constantly, then scrape the warmed egg yolks back into the saucepan.


Stir the mixture constantly over medium heat with a heatproof spatula, scraping the bottom as you stir, until the mixture thickens and coats the spatula, reaching 170 - 175 F. 


Pour the custard through the strainer and stir it into the cream.  Stir until cool over an ice bath.


Chill the mixture thoroughly in the refrigerator (overnight is good), then freeze it in your ice cream maker.


Variation (which I have not tried yet): To make Lemon-Fresh Ginger Ice Cream, grind the zest of 2lemons with the sugar in blender or food processor and warm it with the milk.

The Mr enjoys a sandwich
stay cool!


Mrs H
tweet us @_mrs_h
Follow us on Facebook!

ShareThis

LinkWithin

Related Posts with Thumbnails